|
Getting your Trinity Audio player ready...
|
Mobile Push Notification
To send any important or time-sensitive information to mobile app users, push notification is the safest and most efficient way. It is one of the most economical ways of connecting with clients. Push notifications are a fantastic substitute as they operate on the permission-based marketing method. It does not annoy clients with unwanted messages or emails in the long run.
How do Push Notifications work?
Push notifications are brief messages on a user’s smartphone or desktop to deliver any information or prompt them to perform a certain action on the whole.
If a user has installed your mobile app on their phone and has chosen to accept push notifications, you can send them without any difficulty. The OS push notification service registers special IDs for the app and the device when a user starts the app. The Special IDs are use to manually build and send push notifications to users in order to increase user engagement or provide crucial messages.
In the case of an e-commerce business, push notifications might be the ideal form of communication. It helps you to keep your consumers informed about the newest deals and goods in their shopping cart. Notifications can be a wonderful method for businesses to interact with customers. Push notifications can allow you to time the message and even alter it based on the circumstance. Customers who had abandoned their shopping carts, for instance, would get a reminder. Those who hadn’t used the app in a while would get offers that were pertinent to them.
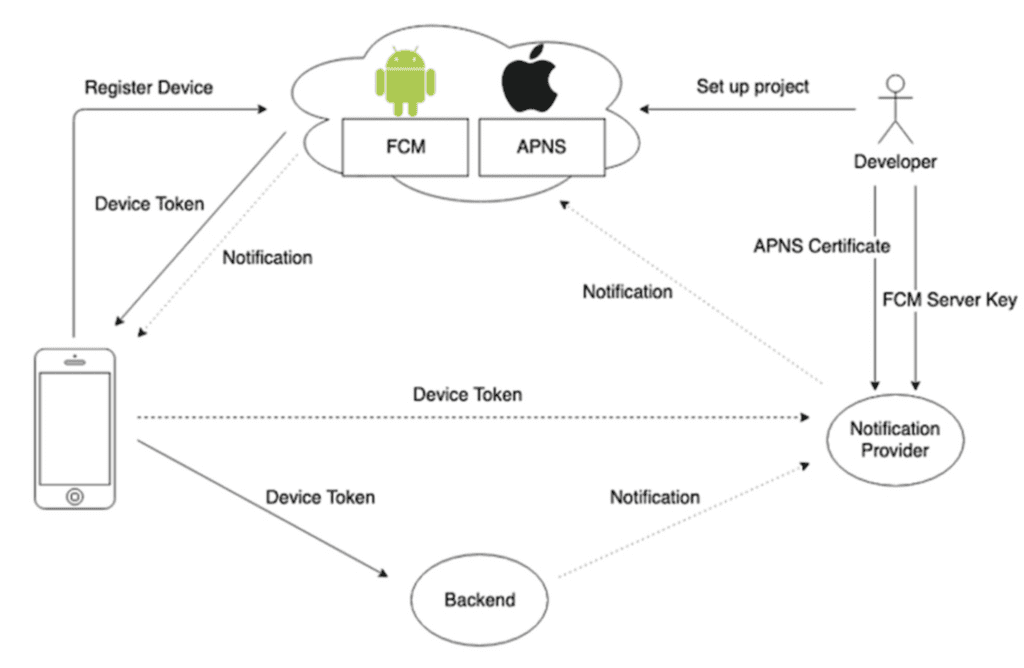
Let’s use FCM as an example to show how these services operate further. FCM is a messaging service that enables members to receive notifications from websites and mobile applications. So application servers send the notification content and subscriber’s data. After checking the data, FCM notifies the end consumers via their devices. The devices send Click and Delivery information back to the application after receiving the notification.
However, mobile push notifications have limitations, just like any other form of communication, such as technological restrictions on the size of text or image blocks. Many of these restrictions mainly depend on the operating system being used.
Push Notification Providers List
Using the push notification providers listed below, you can deliver push notification messages to desktop computers as well as mobile devices.
FCM
Firebase Cloud Messaging (FCM) is a cross-platform cloud messaging solution that lets you reliably send messages at no cost. So in simple words, we can say that FCM is a highly sophisticated and advanced version of GCM.
FCM provides a reliable and battery-efficient connection between your server and devices that allows you to deliver and receive messages via notifications on iOS, Android, and the web at no cost. For use cases such as instant messaging, a message can transfer a payload of up to 4KB to a client app
Apple Push Notification Service:
Apple Push Notification Service is a cloud platform by Apple, which allows third-party application developers to send push notifications to their applications installed on Apple devices. As a result, application developers can send personalized alert messages, play sounds, set a badge (with a number) over the app, do activities without launching the app, display media attachments, and more.
APNS gives Unified Endpoint Management (UEM) a mechanism to communicate with one another. It sends messages and notifications to associated Apple devices. APNs serve as a gateway between a UEM server and its associated Apple endpoints. The notification is sent to the APNs server, which reroutes it to the target devices. To do this, you must first create an APNS certificate that is good for a year. You must renew the certificate after it expires by usual procedure.
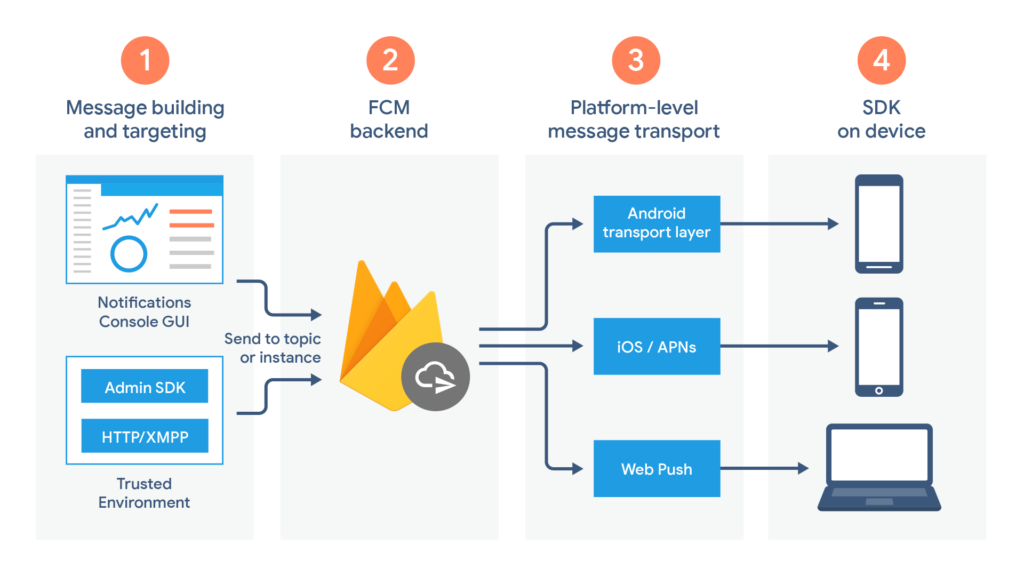
FCM with APNS
An application that has enabled push notification uses services like APNs and FCM.
FCM sends the message to the devices via the platform-specific transport layer when the device is online.
- Android transport layer (ATL) for Android devices
- Apple Push Notification service (APNs) for Apple devices
FCM displays and handles the notification based on the app’s foreground/background state on the user’s device.
Adding Firebase to Android and IOS project for push notification
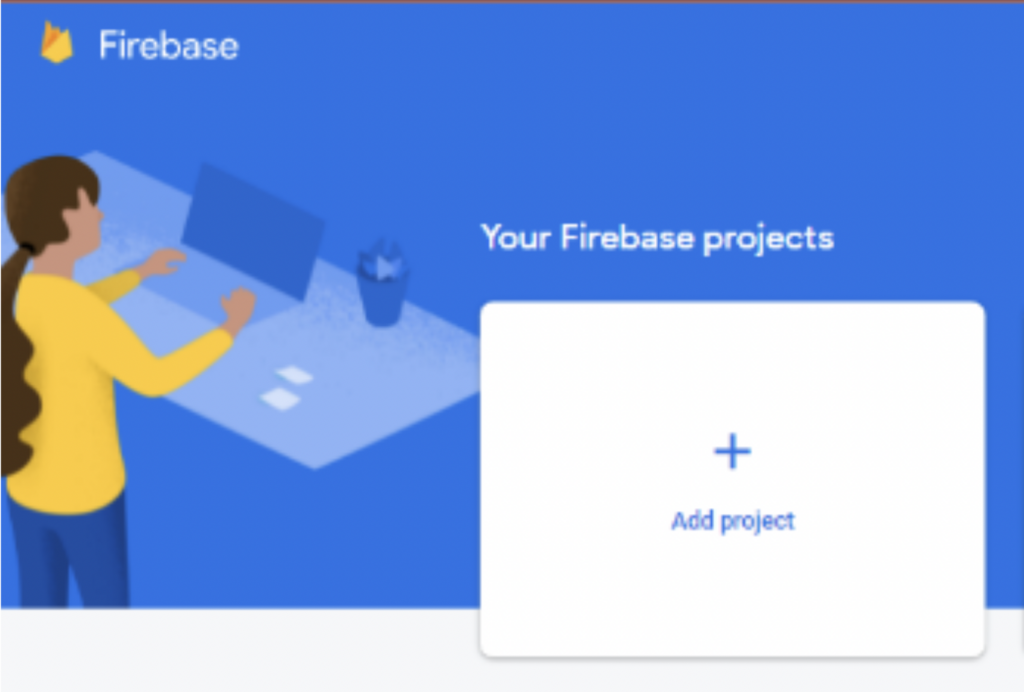
Step 1: Create a New Firebase Project
To integrate push notifications, we need to create a firebase project first. Click on add project to create a project.
When you click the Add Project button, it will ask you for your project name. Fill in the project name box with your project name and click the Create Project button.
Step2: Register your application
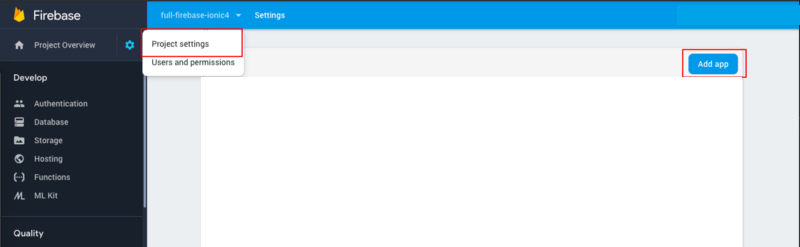
After Registering the android app click on download the google-services.json file and paste it into the android/app in the root directory of your application module.
After registering the IOS app, download the “GoogleService-Info.plist” file and add that file into your root folder(PROJECT NAME/ios) of your project from Xcode.
Step3: Dependency for push notification
Multiple packages can be used to add push notification dependency to your React application. react-native-firebase is a popular package that can add all Firebase functionalities to React applications. Although, we use the package react-native-push-notification, which only deals with the push notification functionality. However you can get the package using node package manager/yarn with the following snippet (from GitHub)
npm install –save react-native-push-notification
Step4: Configuration For Android
Use the following code from the Firebase documentation for the project-level build.gradle (<project>/build.gradle)
buildscript {
repositories {
// Check that you have the following line (if not, add it):
google()  // Google's Maven repository
}
dependencies {
...
// Add this line
classpath 'com.google.gms:google-services:4.3.8'
}
}
allprojects {
...
repositories {
// Check that you have the following line (if not, add it):
google()  // Google's Maven repository
...
}
}
Also, create the application level build.gradle (<project>/<app-module>/build.gradle) with this code snippet from the Firebase documentation
apply plugin: 'com.android.application'
// Add this line
apply plugin: 'com.google.gms.google-services'
dependencies {
// Import the Firebase BoM
implementation platform('com.google.firebase:firebase-bom:28.2.1')
// Add the dependencies for the desired Firebase products
// https://firebase.google.com/docs/android/setup#available-libraries
}
Add the following code to AndroidManifest.xml (from GitHub)
<uses-permission android:name="android.permission.WAKE_LOCK" />
<permission
android:name="${applicationId}.permission.C2D_MESSAGE"
android:protectionLevel="signature" />
<uses-permission android:name="${applicationId}.permission.C2D_MESSAGE" />
<uses-permission android:name="android.permission.VIBRATE" />
<uses-permission android:name="android.permission.RECEIVE_BOOT_COMPLETED"/>
<application .......>
<meta-data android:name="com.dieam.reactnativepushnotification.notification_channel_name"
android:value="YOUR NOTIFICATION CHANNEL NAME"/>
<meta-data android:name="com.dieam.reactnativepushnotification.notification_channel_description"
android:value="YOUR NOTIFICATION CHANNEL DESCRIPTION"/>
<meta-data android:name="com.dieam.reactnativepushnotification.notification_color"
android:resource="@android:color/white"/>
<receiver
android:name="com.google.android.gms.gcm.GcmReceiver"
android:exported="true"
android:permission="com.google.android.c2dm.permission.SEND" >
<intent-filter>
<action android:name="com.google.android.c2dm.intent.RECEIVE" />
<category android:name="${applicationId}" />
</intent-filter>
</receiver>
<receiver android:name="com.dieam.reactnativepushnotification.modules.RNPushNotificationPublisher" />
<receiver android:name="com.dieam.reactnativepushnotification.modules.RNPushNotificationBootEventReceiver">
<intent-filter>
<action android:name="android.intent.action.BOOT_COMPLETED" />
</intent-filter>
</receiver>
<service android:name="com.dieam.reactnativepushnotification.modules.RNPushNotificationRegistrationService"/>
<service
android:name="com.dieam.reactnativepushnotification.modules.RNPushNotificationListenerService"
android:exported="false" >
<intent-filter>
<action android:name="com.google.firebase.MESSAGING_EVENT" />
</intent-filter>
</service>
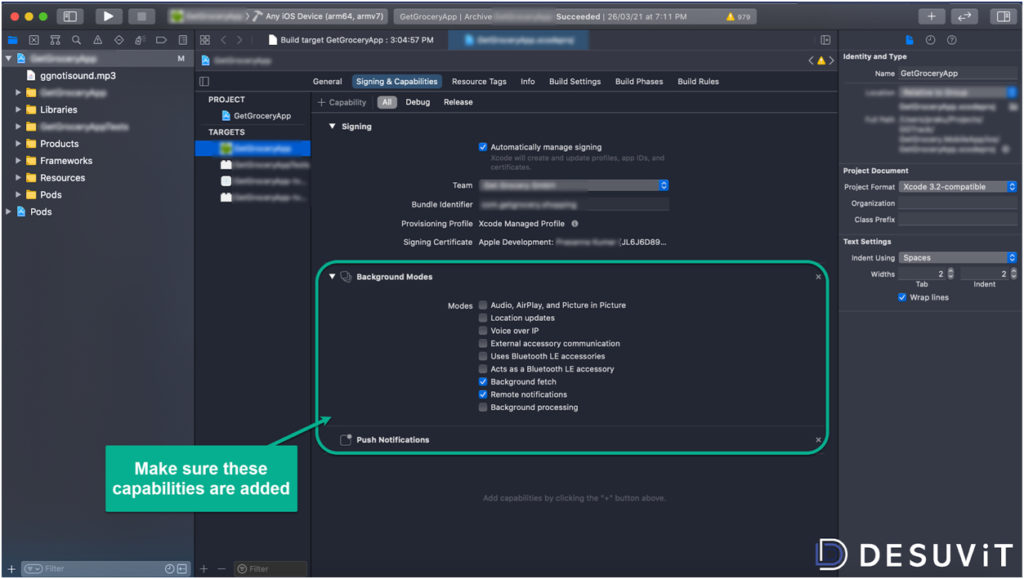
... </application>Step5: Configuration For IOS
Add the capabilities “Background Modes” & “Push Notifications” for the project in Xcode.
Add the highlighted lines of code in the pod file as shown below and Run the command “pod install”,
require_relative '../node_modules/react-native/scripts/react_native_pods'
require_relative '../node_modules/@react-native-community/cli-platfor'

platform :ios, '10.0'
# pod "Firebase/Analytics'
pod 'Firebase/Messaging

target 'PushNotificationApp' do
  config = use _native_modules!
  use_react_native!(: path -> config["reactNativePath"))

  pod 'RNFBApp' ,:path =› '../node_modules/@react-native-firebase/app'
  pod 'RNFBMessaging :path =›../node modules/Greact-native-firebase/app'

  target 'PushNotificationApptests' do
    inherit! :complete
    # Pods for testing
end
In the “AppDelegate.m” file add the below line of code
#import"AppDelegate.h"
#import <React/RCTBridge.h>
#import <React/RCTBundleURLProvider.h>
#import <React/RCTRootView.h>
#import <Firebase.h>
#import <UserNotifications/UserNotifications.h
#import <RNCPushNotificationIOS.h>

#ifdef FB_SONARKIT_ENABLED
#import <Flipperkit/Flipperclient.h>
#import <FlipperkitLayoutPlugin/FlipperkitLayoutPlugin.h>
#import <FlipperkitUserDefaultsPlugin/FUserDefaultsPlugin.h
#import <FlipperKitNetworkPlugin/FlipperkitNetworkPlugin.h>
#import <SKIOSNetworkPlugin/SKIOSNetworkAdapter.h>
#import <FlipperkitReactPlugin/FlipperkitReactPlugin.h>

static void InitializeFlipper (UIApplication *application) {
 FlipperClient *client - [FlipperClient sharedClient];
Step6: React Native Implementation
Use the following code (from GitHub) to call PushNotification.configure at the start of the app. Write the code in a separate JS file and imported to App.js.
import React, {Component} from "react";
import PushNotification from "react-native-push-notification";
// var PushNotification = require("react-native-push-notification");
export default class PushController extends Component{
componentDidMount(){
PushNotification.configure({
// (optional) Called when Token is generated (iOS and Android)
onRegister: function(token) {
console.log("TOKEN:", token);
},
// (required) Called when a remote or local notification is opened or received
onNotification: function(notification) {
console.log("NOTIFICATION:", notification);
// process the notification here
// required on iOS only
notification.finish(PushNotificationIOS.FetchResult.NoData);
},
// Android only
senderID: "1090501687137",
// iOS only
permissions: {
alert: true,
badge: true,
sound: true
},
popInitialNotification: true,
requestPermissions: true
});
}
render(){
return null;
}
}
Step7: Sending Notifications using FCM
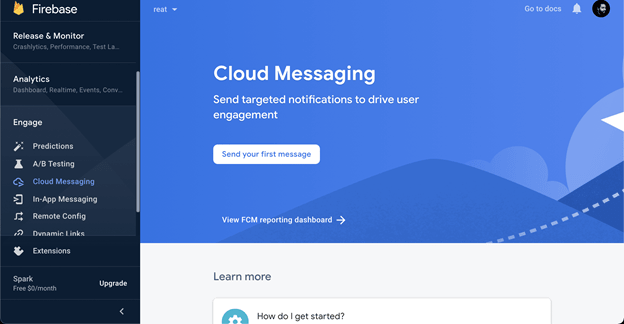
- Go to the FCM dashboard to send messages. It is in the Engage>Cloud Messaging section.
- Follow the prompts to compose and select targets for the push notification.
- Select the targets you need.
- You can decide to send the message now or schedule it for another time.
- Modify the additional option based on your requirements.Then, click the review button. Click the publish button in the following popup to send the message according to the settings you provided.
- According to the targeting criteria, FCM sends the pushed notification to the application on schedule.
Amazon Simple Notification Service:
Amazon Simple Notification Service (ASNS) is a notification service that offers a cheap infrastructure for sending messages in abundance, primarily to mobile consumers. Hence the application-to-person (A2P) functionality of Amazon SNS enables you to send messages to users at scale via SMS, mobile push, and email.
One of the challenges with push notifications is that each platform (Kindle, iOS, Android, Windows Phone/Desktop, Baidu) has different APIs and different requirements to send pushed notifications. Amazon SNS mobile push comes into play as a broker between your application’s back-end and the various push notification services so you can use a single API to send pushed notifications.
In order to send push notification messages, Amazon SNS needs some information like push notification service credentials and a device token or registration ID (representing your mobile device and mobile app) received from the push notification service.
Steps to follow to use SNS:
- Register the mobile app with one of the supported push notification services and obtain the push notification service credentials. For example, If the platform has to use Apple Push Notification Service (APNs), create the Apple Push Services certificate in your Apple Developer account and obtain the .p8 or .p12 file (exported from Keychain Access). And if the platform has to use Firebase Cloud Messaging (FCM), create a firebase project and obtain the server key from the firebase console.
- To register an app with Amazon SNS, a platform application called PlatformApplicationArn must be created using the push notification service credentials. Obviously, the Push notification service credentials were kept by Amazon SNS as a platform application resource and are utilized to communicate with the various push notification services on your behalf. For example, If the platform uses Apple Notification Service (APNs), then either token or certificate-based authentication can be chosen. In the case of certificate-based authentication, the .p8 or .p12 file (exported from Keychain Access) has to be uploaded to Amazon SNS. If the platform uses Firebase Cloud Messaging (FCM), then Server Key retrieved from the firebase console has to be uploaded to Amazon SNS.
- The push notification services will return a device token or registration ID if you register an app and a mobile device together, this will uniquely identify a mobile app instance on a certain mobile device.
- By using the device tokens and the PlatformApplicationArn, create platform endpoint objects called as EndpointArn, to which notification messages can be sent.
- Create a message and publish it to a mobile app using the EndpointArn.
To Read about React Native Fabric Architecture click here
To Read about Rect Native with Sentry click here
Get to know about Rently at https://use.rently.com/
Co-Authors

Divagar M
Senior software engineer
Rently