|
Getting your Trinity Audio player ready...
|
The book guides you through the basics of React Testing Library, along with some testing recipes and cooking tips for testing on the way!!
We have created this handbook based on various documents and blogs that inspired us to create this beginner-friendly handbook.
Prerequisites
The book believes that you know the basics of React and that you have done some tests along the way using React testing library.
Flavors of Testing React Applications:
“The more your tests resemble the way your software is used, the more confidence they can give you.” – Kent C. Dodds
If you want to learn more about the Guiding Principles of React Testing Library check out this:
https://testing-library.com/docs/guiding-principles These are the common flavors of testing applications:- Unit testing – verifies that the individual, isolated parts of the component are working as expected
- Integration testing – verifies that several units will be working together
- End to End / Functional testing – will be like a helper robot that will behave like a user to click around the app and verify the app functions correctly as expected
The book says you can use React testing library to cook these types of tests. So pick a recipe and start cooking your tests!
Let’s get into the recipes for using React Testing library.
Snapshots

Let’s get into the first testing recipe that’s taking a picture of your rendered component.
Snapshots are similar to pictures that you take out of your camera. It’s the output of your component that has been rendered in a DOM.
It helps us to identify if there is a change in UI. We have to keep a snapshot file inside the repository and compare the newly rendered DOM with it.
- Snapshot tests are very useful whenever you want to make sure your UI does not change unexpectedly.
- Snaps are the output of your component that will be rendered in the DOM. The test will fail each time there is a change in UI.
- This kind of test notifies us of unexpected changes in the UI
When to take a snapshot?
Once we see the mighty power of snapshots, it is natural to write snapshots for all components, but that is not necessary.
They are huge and hard to look at, therefore we have to take snapshots only when necessary. Some of the places we feel that it is necessary for snapshots are below:
- Snapshots should be taken only when the UI is completely rendered with all the data
- There can be more than one snapshot when a component is rendered conditionally
When not to take a snapshot?
- Snapshots should not be taken for UI that is still in transition due to an event or waiting for an asynchronous task to complete.
- It should be taken only for a stable UI with mock data, the reason we say mock data is because real API data can change over time causing the tests to become flaky
- A timer snapshot is most likely to fail every time.
Important note: Use mock data that is similar to your real data and keep it up to date
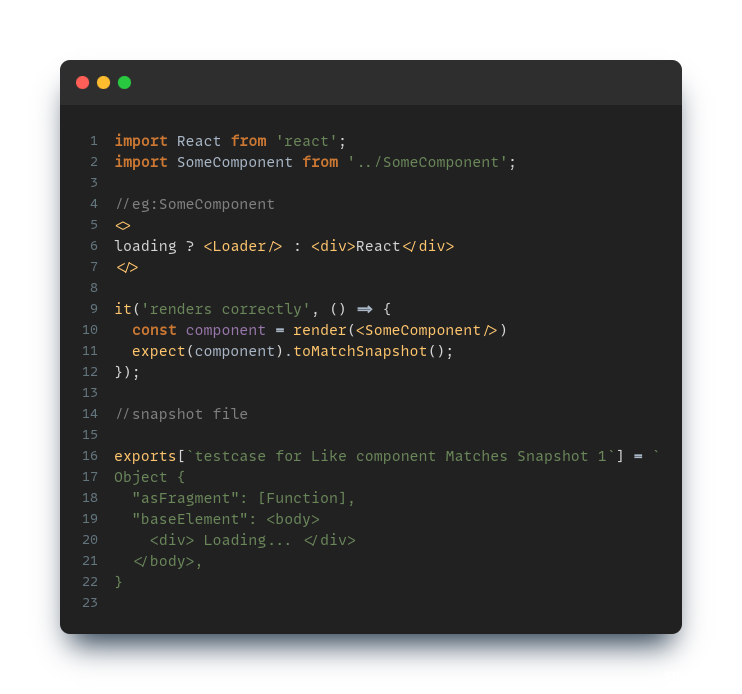
Note: Always check the snapshot file. Some times snapshots may not contain fully rendered UI because of some asynchronous updates.
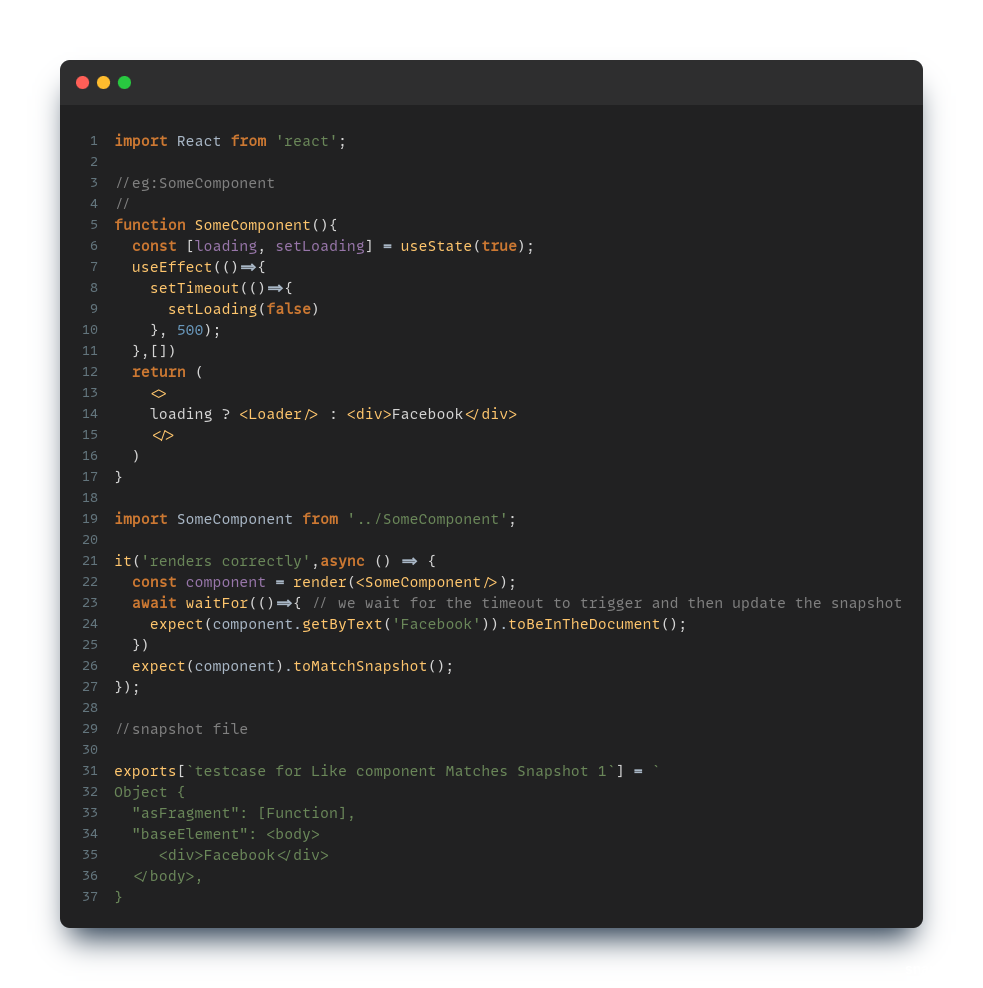
Asynchronous Methods

The book says “Always wait for some time for the DOM to cook whenever you have fired an event”
React testing library provides several functions to deal with asynchronous code. These can be useful to wait for an element to appear or disappear in response to an event, user action, timeout, or Promise.
Always Make sure to use await before these methods
An async function without await is firing your stove and leaving. You never know what happens to it!
List of Async Methods in React Testing Library
- findBy (all findBy queries are asynchronous)
- waitFor
- waitForElementToBeRemoved
Eg :
await waitFor(() => expect(mockAPI).toHaveBeenCalledTimes(1))
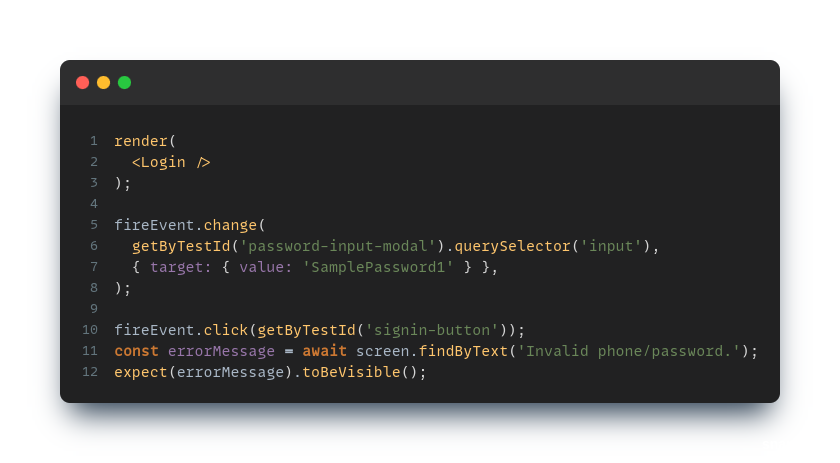
QueryBy
- Use the queryBy whenever you need to check non-existence because queryBy does not throw like the other testing library methods.
For more information on the available methods check out: https://testing-library.com/docs/react-testing-library/cheatsheet/
expect(queryByText(‘SignOut’)).not.tobeInTheDocument();
If you want to check something that is not available initially prefer to use findBy. Since findBy is asynchronous and it reduces the lines of code by avoiding waitFor.
const submitButton = await screen.findByText(‘Login’)
Don’t mock or spyOn react’s inbuild hooks/lifecycle methods
The book says “Always taste the food, not the stove”.
While testing, we have to focus on testing the output and functionality of the component as observed by the user.
Some wrong Eg: mocking on useState() and checking whether it’s called, is unnecessary. Because we can expect the reflection in UI instead of mocking useState.
In order to test the updation of a state or triggering of any lifecycle method/hook. We have to always expect the UI to be updated, as seen by a user!
Note: we can expect the functions / events inside the component lifecycle methods but not the component lifecycle method itself
Proper Expects
The book says “You should not expect spice in an ice cream”.
So expect properly to make sure your tests cover your code.
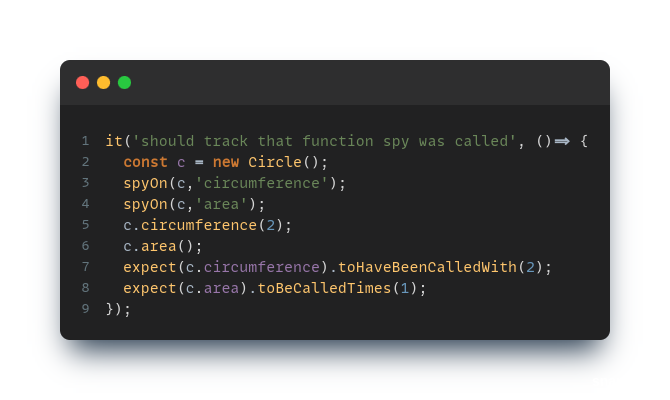
- Always Expect with values or parameters, like using toHaveBeenCalledWith() instead of toHaveBeenCalled()
Eg:
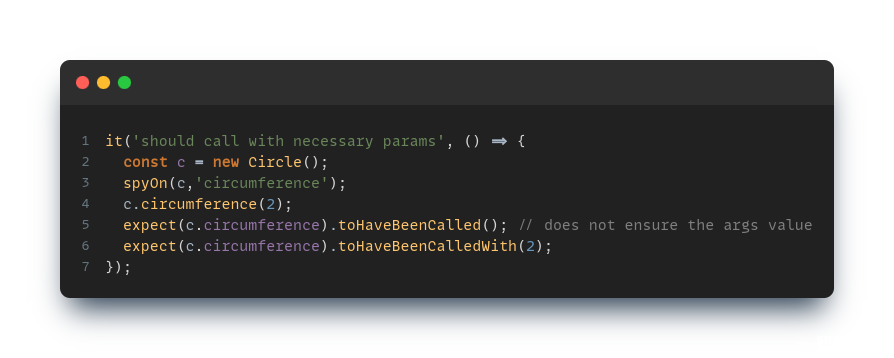
- If there is more than one function call in a block expect all the functions to be called with the right parameters.
Eg:

- Check the number of times the function is called within the test case
Checking for Multiple items in the List

- Use loops to avoid writing excessive tests on a list
- Even though looping covers all your code in some cases if an item is modified/ removed it never fails!! Therefore never letting you know that something has changed
Tip: Create a separate constant list and use it to loop so that even if somethings changed the test fails!!
Clearing Mocks and mock states Properly
- Improper cleaning of mocks and mock states means you are “To jump out of the frying pan into the fire “. If you do not properly clear mocks and mock states the tests do not work well!!
Tip: You can use .only while writing individual tests so that the test case is not affected by above tests.
Using jest.clearAllMocks():
Resets all the mocks usage data, not their implementation.

Since the mock data is not cleared the mock function is called 2 times.
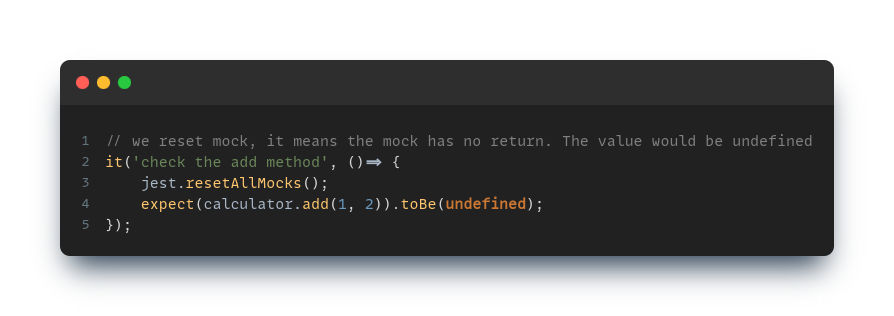
Using jest.resetAllMocks()
It will replace the mock function with a new jest.fn()
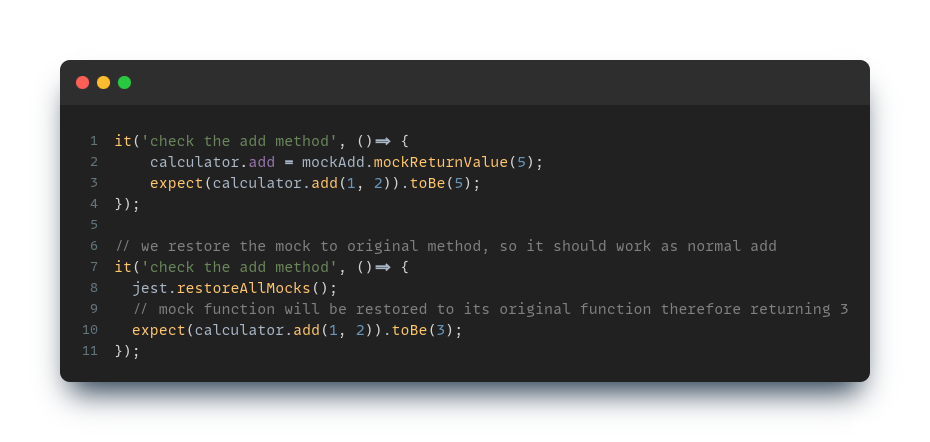
Using jest.restoreAllMocks()
restoreAllMocks will clear the mock states and reset the function to its original implementation
Mock states may get carried over to the next tests
Use clearAllMocks to avoid these behaviors
afterEach(() => {
 jest.clearAllMocks();
});
Having multiple assertions in waitFor
The book says “Too many cooks spoil the broth”.
- waitFor separately works best, but the waitFor does not wait for each individual expect block.
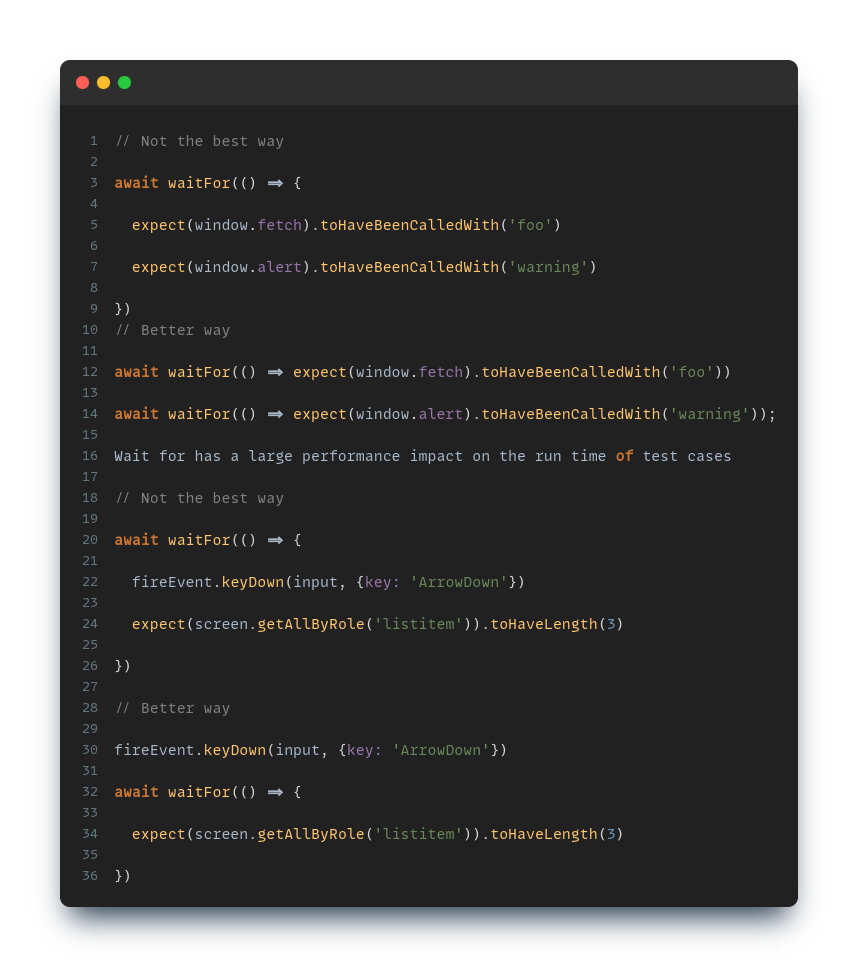
Don’t have fireEvents inside waitFor
Tip: Don’t have any synchronous code inside waitFor
waitFor method is a powerful asynchronous function that helps us to make an assertion after a non-deterministic amount of time.
The way waitFor works is that polls until the callback we pass stops throwing an error. So if we were to make side-effects within the callback, those side-effects could trigger a non-deterministic number of times. There is a default timeout also for waitFor.
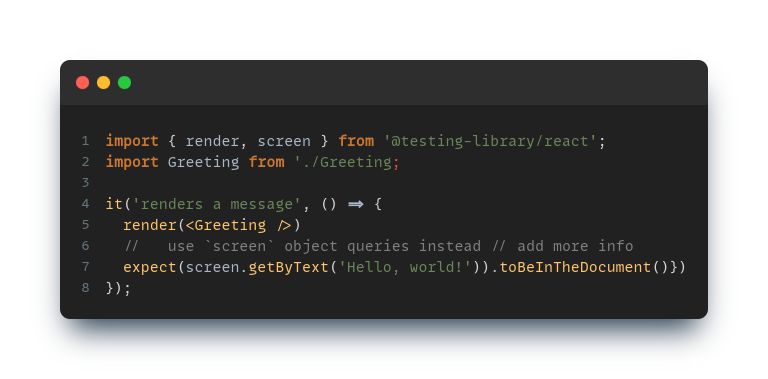
Instead of destructuring from render, use screen
The book says “Keep knives close to the vegetables”. You can use the screen to avoid unnecessary destructing of methods
Chaining mocks
When mocking multiple modules you can chain them:
jest
.mock('./time', () => jest.fn())
.mock('./space', () => jest.fn());
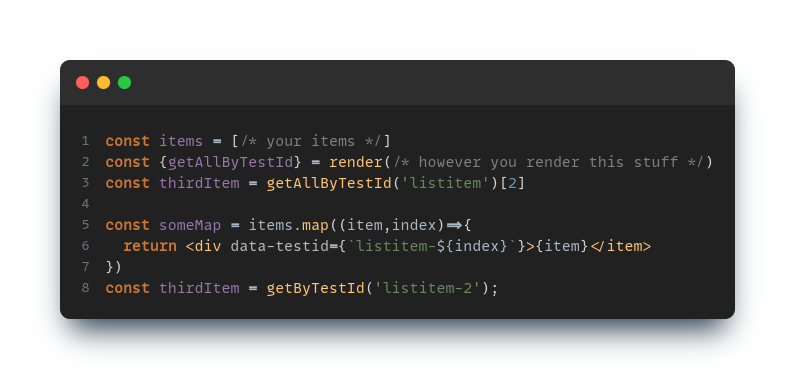
Try to use getByText instead of data-testids for unique texts
While using data-testids give you a stable reference to test the component. It does not verify the text message in the component. So it’s better to use the text in your component when it’s unique as it helps you verify the text along the way reducing your expect blocks. You can use findByText also to wait for async updates.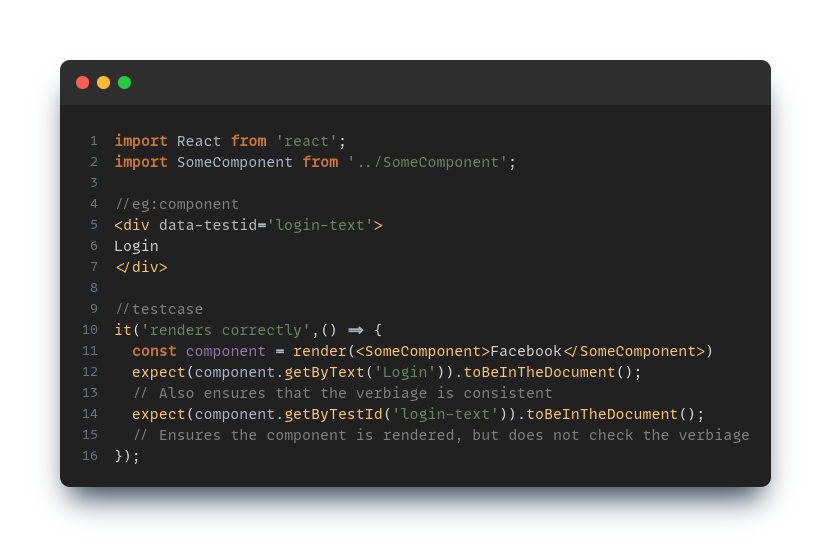
Mocking:
- Try to use automatic mocks i.e jest.mock(‘filename’);
- If you want to mock a specific function in a file alone it’s better to use spyOn as it will only mock the function it’s spying on
- Don’t use both jest.mock and spyOn on the same files.
Tip : Avoid using default exports and named exports in the same files, as they will make the mocking harder.
Methods of mocking:
Mocking a named export
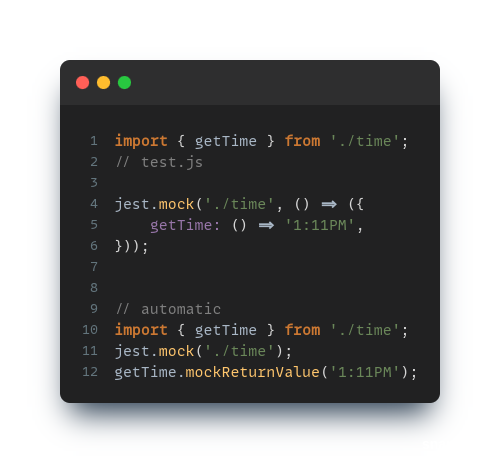
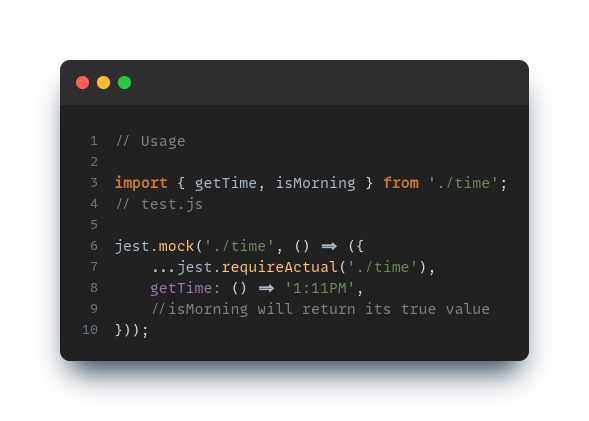
If you wanted to mock an imported named function, say getTime:
- Automatic mocks can be used
Note : this will mock all the other named functions as jest.fn()
Mocking only the named import (and leaving other imports unmocked) – Instead, you can use a spyOn
When there are multiple functions in a module, and you only want to mock one, you can use requireActual:
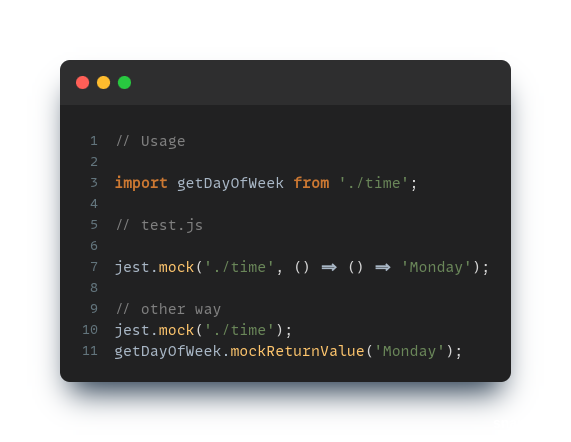
Mocking a default export:
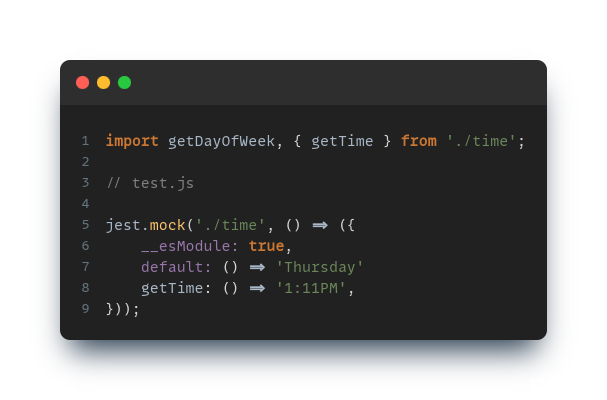
Mocking default and named exports
When you want to mock default and named imports, you’ll need to remember to use __esModule: true.
Mocking Functions inside a module that use another function in the same module
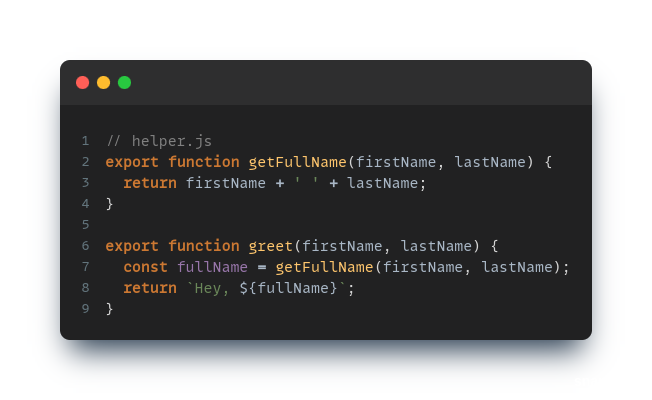
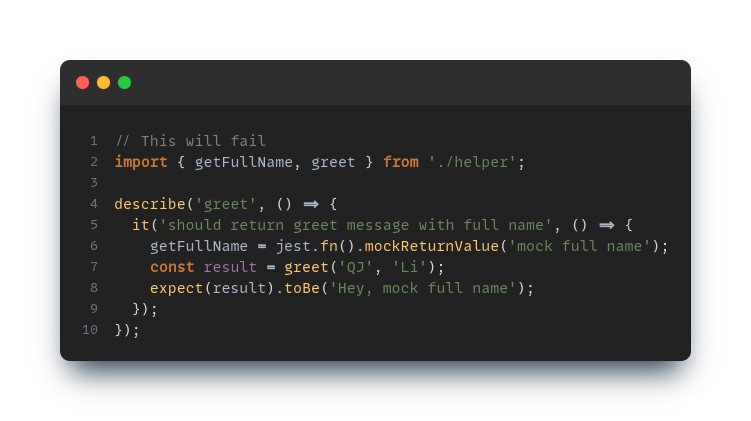
Mocks will only work for exported functions. Since the greet function uses the function directly from the file it will not be mocked.
You can also check this blog Jest — How To Mock a Function Call Inside a Module which provided us with the information to write this article!!
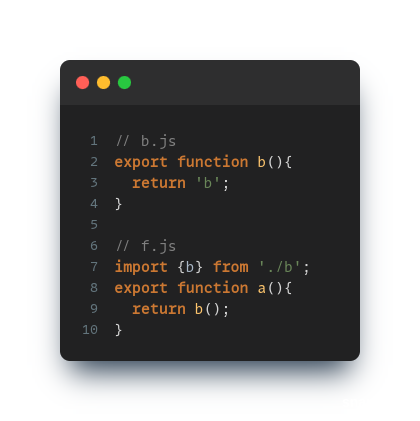
Solution 1 — Splitting The Module Into Different Files
If you move b to its own file:
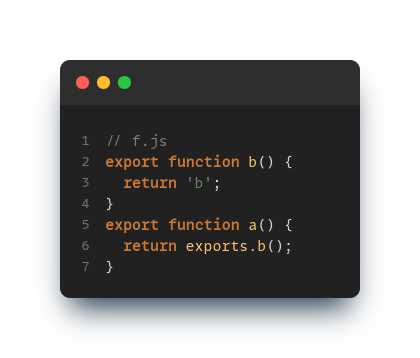
Solution 2 — Calling The Mocked Function Using Exports
Adding exports before calling the function. This makes the function use the exported reference of the function
ACT errors:
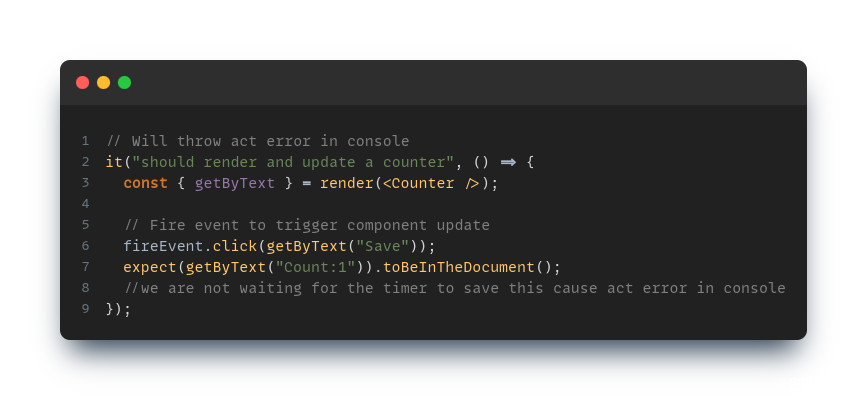
These errors may mock you over!
Warning: An update to YourComponent inside a test was not wrapped in the act(…).
When testing, code that causes React state updates should be wrapped into the act(…):
act(() => {
/* fire events that update state */
});
/* assert on the output */
This ensures that you’re testing the behavior the user would see in the browser. Learn more at – https://fb.me/react-wrap-tests-with-act
Looking into act errors are essential as they show you some unnecessary side effect that you might have not expected
Note : add await waitFor( ) for the next expect()
Eg:
await waitFor(() => expect(screen.queryByText('saved')).toBeInTheDocument())
Testing File Uploads:
For testing file uploads, we can use the fireEvent change method and update the target with files by creating a mock file.
Eg:
fireEvent.change(getByTestId('upload-front-id'), {
  target: {
    files: [new File(['(⌐□_□)'], 'someimage.png', { type: 'image/png' })],
  },
});
Testing Timer Related Components:

Working with timer-related components can be similar to defusing a bomb. If you change something all the tests break!!
Always be cautious with timer-related tests, since it causes tests to become flaky. They also could affect a lot of the performance of your tests.
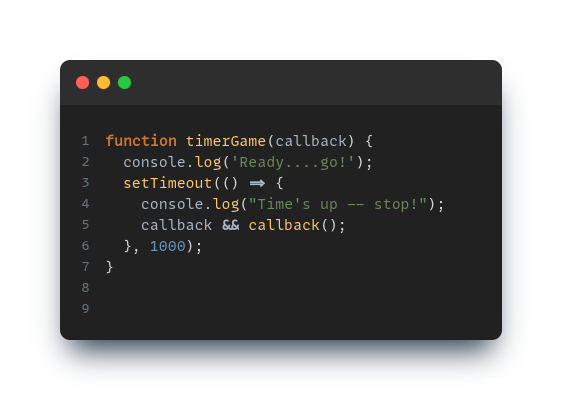
TestFile.js
While you can call jest.useFakeTimers() or jest.useRealTimers() from anywhere (top level, inside it block, etc.).
It is a global operation and will affect other tests within the same file. Additionally, you need to call jest.useFakeTimers() to reset internal counters before each test.
If you plan not to use fake timers in all your tests, you will want to clean up manually, as otherwise, the faked timers will leak across tests:
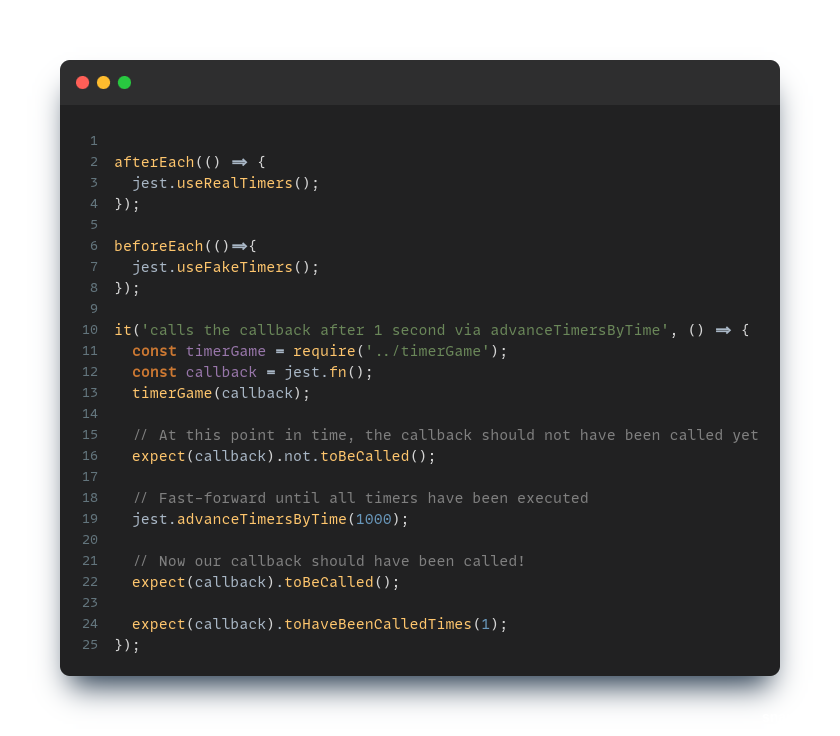
useFakeTimers() is leaky and should be cleaned up manually otherwise it will affect all the timeouts
jest.runOnlyPendingTimers(); – can be used to Fast forward and exhaust only currently pending timers (but not any new timers that get created during that process)
setupTests.js
If your app uses a browser API that you need to mock in your tests or if you need a global setup before running your tests, add a src/setupTests.js to your project. It will be automatically executed before running your tests.
// jest-dom adds custom jest matchers for asserting on DOM nodes.
// allows you to do things like:
// expect(element).toHaveTextContent(/react/i)
// learn more: https://github.com/testing-library/jest-dom
import '@testing-library/jest-dom';
const localStorageMock = {
  getItem: jest.fn(),
  setItem: jest.fn(),
  removeItem: jest.fn(),
  clear: jest.fn(),
};
global.localStorage = localStorageMock;
Finally, the book recommends that you write your tests in a way that they resemble the user behavior and fail more often when there are changes. Having test cases that are more volatile always keeps us in check. Keep in mind that it should be decoupled and fail only when there is a change in the module you are working on, not in any other modules.
Now that you have learned basic cooking skills, start cooking your tests!
While cooking your way, you may learn new recipes and tips, feel free to share those below.
References
https://testing-library.com/docs/guiding-principles
https://www.benmvp.com/blog/react-testing-library-best-practices/
https://www.emgoto.com/mocking-with-jest
https://medium.com/welldone-software/jest-how-to-mock-a-function-call-inside-a-module-21c05c57a39f
