|
Getting your Trinity Audio player ready...
|
We might have heard that GIT is more flexible and easy to track versioning, but mightn’t have gone into it deeper. What makes GIT a better tool for version control? Let’s go through the facts and insights of GIT that make it flexible and also we will know about some commonly used commands Before we get deep into GIT, let’s focus on understanding version control systems(VCS).
VCS is the method of keeping track of our files and storing their history. If we are working on modifying a particular file and at some point, we feel like reverting back and forth to our changes how will we resolve it normally? How many ctrl+z and ctrl+y will we be able to perform without much impact? It’s tough is it not? So in this case what will be our next approach? We will think one step ahead and will store our file changes periodically in a new file naming it with the date of modification under a folder.
With this approach, we won’t be able to maintain the versions for a long time accurately for a growing project. So here the VCS comes into the picture for reducing the manual intervention to do versioning of files. In version control, each change made to a file is continuously recorded over time for future reference, and the old versions can be recalled at any time.
Types of Version Control System(VCS):-
- Local VCS
- Centralized VCS
- Distributed VCS
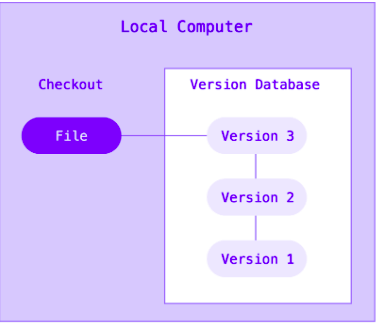
Local Version Control System:-
In Local VCS, there is a simple database that keeps all the changes of files under revision control locally. RCS is one of the popular VCS tools, which stores the patches made in a file and helps to retrieve them at any point in time.
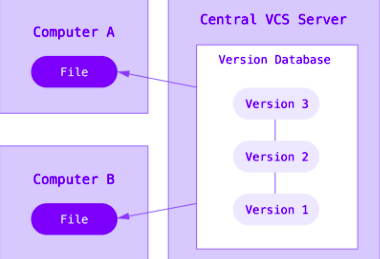
Centralized Version Control System:-
The major problem faced in Local VCS is that it can’t be used in development projects where we need to collaborate with other people since all are under local control. To mitigate this problem centralized VCS was introduced. In centralized VCS, there will be a common server, from which we will be able to check out our files needed. When we check out, the exact copy of the file will be loaded into our system and the changes will be tracked by the central server.
In this way, we will be able to collaborate with our peers in developing the same project with version tracking. In a centralized server, the disadvantage is that there is a high chance of losing the data since we will have only one common server. If that common server is down, then recovery will not be possible.
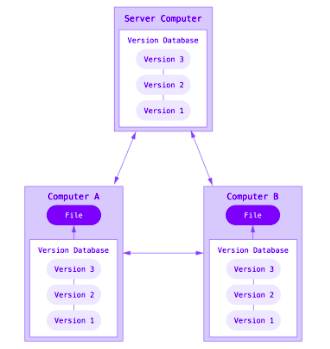
Distributed Version Control System:-
To mitigate the problems that centralized VCS have, the distributed VCS was introduced. Here the exact copy of the complete repository can be cloned into each one’s machine with version control. Now having clones of the repository in each one’s machine developers are less dependent and loosely coupled with each other. Even if the main server is down and data is lost, it can be easily backed up with the repositories cloned in other local systems. GIT uses this distributed VCS and that is the answer for why GIT is so flexible.
GIT Introduction:
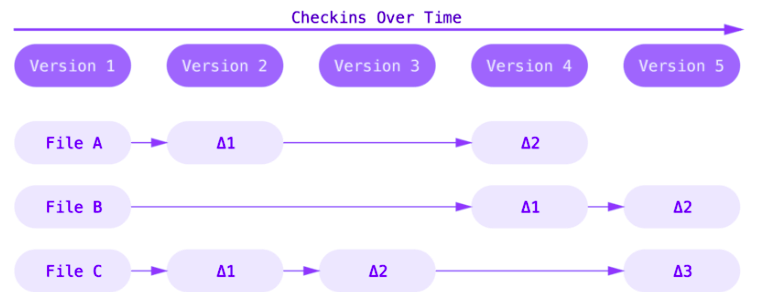
Git basically stores snapshots but not the differences. What does it really mean? Let’s try to understand it. As we have previously discussed, GIT uses distributed VCS. To know the advantage of Distributed VCS we need to know how the Local and centralized VCS works. In local and centralized VCS, the changes made in a file are tracked with each change made to it. Basically called as delta based versioning. It stores a set of files and the changes made to it over time.
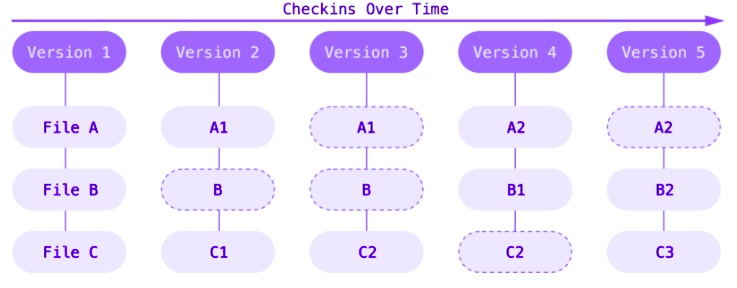
But GIT or distributed VCS has a different approach in that it stores the file and the complete snapshot of the file along with the changes made in it over time. GIT takes the reference of how the file currently looks and maps it to its previous snapshot. If in a particular version, the file is not modified, then the same previous state is taken as a reference without saving it again. This can be called a stream of snapshots.
Three States of GIT:-
- Modified
- Staged
- Committed
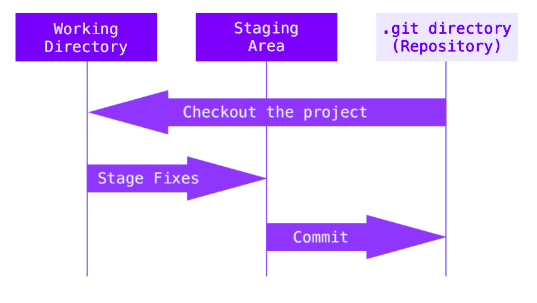
When we modify the files of a repository and save those and it will be under a modified state.
If we decide that the changes made are necessary we will be adding those file changes by which it will be moved to the staged state and once all the file changes are done we need to commit the file which marks the file to go into the next commit snapshot as a modified file. When it is Committed then the file is saved in our local database. Then if we push the file the changes will reflect in the remote repository. This is the basic cycle in GIT.
GIT BRANCHING AND MERGING:
Branching is creating a new version of the main repository. This branching is the most expensive for many of the VCS tools and some are creating a new copy of the main directory. GIT shows its distinctiveness in branching by making branching operations rapid and lightweight. Creating new branches and switching between branches is really easy in GIT.
Creating a new git branch:
Before starting development, we should create our own development branch from the main branch. Initially, the pointer will be in the main branch, so we can use the following command to create a branch dev_1 from the main branch.
git branch dev_1
It will create a new branch dev_1 from the main branch.
Switching to a new git branch:
After creating the branch, the pointer will be still in the base branch. If you do any code changes, it won’t reflect in your new branch. Then we should first switch to the branch where we need to make the code changes. We can use the following command to switch to the Now the pointer will point to the branch dev_1 and you can start to do your code changes.dev_1 branch.
git checkout dev_1
Now the pointer will point to the branch dev_1 and you can start to do your code changes.
Creating and switching to a new git branch:
With the following command, you can create a new branch and switch to the branch as well.
git checkout -b dev_1
Staging the files for commit:
When you do your code changes, by default the changes will be in the modified state. If we want to add that change in a commit, we have to add that file in the staging area. Then only the file changes will be added to that commit snapshot. The following command can be used to add the files in the staging area.
git add file_path
Example: git add src/lib/file1.txt
Commit the changes:
After adding the files in the staging area, we have to commit our changes and git will create a committed snapshot. It will contain the commit id, name, and email of the user who committed these changes. The following command can be used to commit the changes.
git commit -m “Commit description”
Without adding the files using add command, we can directly add the specific files in staging and commit the changes with the following command.
git commit -p file_path -m “Commit description”
Example: git commit -p src/lib/file1.txt -m “Commit description”
Git ignore:
When we create, modify, or delete a file, it is automatically added to the working directory. However, we may require some files, such as third-party plugins or local setups, that are not to be placed in the working directory. Simply put, GIT should not keep track of those files. GIT provides an a.gitignore file as an option. We can specify which files to ignore in the .gitignore file so that git does not track changes to those files.
Pushing the changes to remote:
Once the changes have been committed, we should push the branch to remote. So that others can view or modify their code as needed. The following command can be used to move the branch from local to remote.
git push origin dev_1
Merge the changes:
When you want to merge your branch with any other branch, we have to switch to that branch and run the following command to merge the branch. It will create a merge commit and merge the changes.
git merge dev_1
Revert the changes:
If you believe that the changes you made to the code should be removed from the branch or merged branch. You must reverse the branch commit. Use the following command to undo the commit
git revert commit_id
Example: git revert c80915
Delete the git branch:
If you feel like you want to remove the branch from your local, you can delete the branch completely from your local by switching to any other branch and running the following command.
git branch -D dev_1
We can directly remove the branch from the remote by using the following command.
git push -f origin dev_1
Fetch the remote changes:
When another developer makes some code changes in the branch and updates the remote branch that you are working on, you can use the following command to update the local branches with the changes in the remote.
git fetch origin
-
BEST PRACTICES FOR GIT:
- Use branches for development: Always create your own development branches from the master or the base working branch. Don’t write the code directly in the base or master branch.
- Atomic commit: Do a small or single unit of code change and commit. Having atomic commits will make the reviewers understand the functionality of the code better and easy to revert.
- Write a clear commit message: Write the commit message in a short and detailed manner. The commit should explain what the code will do. Avoid committing messages like refactor, bug fix, update, and revert.
- Set the name and email: Set your professional name and email in git commits. So that the other developers can collaborate with you easily.
- Use pull request to merge: Use pulls request to merge your branches with other branches rather than merging the code directly. So that it can be reviewed by others and the authorized persons can merge or decline the changes.
- Update the branches: Update your development branches frequently with the master branch. So that you won’t get the last minute conflict and also you can adopt your code for the new code changes.
- Push your code daily: Push your code changes in the development branch daily from local to remote. So the other developers in your team or project won’t get blocked by your unavailability.
- Squash merge: Do squash merge when you merge more commits in a single pull request. So that all the commits will be organized under a single merge commit. It will be easy to revert as well.
To learn more about this kind of blog, visit https://engineering.rently.com/quality-engineering/.
Co-Authors

Gunasekaran G
Software Engineer
Rently Software Development Private Limited
Software Engineer
Rently Software development Private Limited